IV Help Guide
Loading...

Attributes and Attribute Sets

Welcome to our tutorial on managing product attributes. Attributes are used for things that differentiate your products, such as size or color. While you could include those aspects in your product names or descriptions, creating attributes lets your customers filter those products by the attributes. Attributes are also required for creating Configurable Products.

Attribute sets are groups of attributes used to create your products. Most products will have many attributes in common, like price or SKU, but you may want specific attribute sets to separate different types of products. For instance, if you are a jewelry store, rings and necklaces would probably have some different attributes.

To begin click the arrow below next to a topic below and our visual guide will appear. To advance to the next step simply click the next button inside the appropriate box.

  • From the navigation menu, choose Catalog> Attributes > Manage Attributes.
  • Click Add New Attribute.
  • Enter an Attribute Code, which is a name for the attribute. It should be lowercase with no space.
  • Select a Scope, which determines how the attribute is used between your different stores. Unless you are planning on your catalog being in multiple languages, we recommend selecting Global.
  • Choose a Catalog Input type for Store Owner, which determines which type of field you select from when entering a value for the attribute. If there will be a limited number of unique values, such as with a list of sizes or colors, we recommend choosing Dropdown. Otherwise, choose whichever best fits your needs.
  • If you want a Default Value for the attribute, enter one. Otherwise, leave this field blank.
  • If the value for the attribute can only be used by one product, set the Unique Value field to Yes. We recommend leaving this field at No.
  • If the value for the attribute is required, set the Values Required field to Yes.
  • Input Validation for Store Owner forces you to specific types of values when filling out the field. We recommend leaving this field at None.
  • The Apply To field lets you restrict the attribute to specific product types. We would generally recommend leaving this as All Product Types.
  • Use in Quick Search determines whether or not the attribute is used in Search results.
  • Use in Advanced Search determines whether or not the attribute is used in Advanced Search results.
  • Comparable on Front-end determines whether or not the attribute is used in Compare Products.
  • Use in Layered Navigation determines whether or not visitors can filter product categories using this attribute.
  • Use in Search Results Layered Navigation determines whether or not visitors can filter search results using this attribute.
  • Use in Promo Rule Conditions determines whether or not the attribute can be used in Catalog Price Rules and Shopping Cart Price Rules.
  • Position determines the sort order of Attributes in Layered Navigation, with lower numbers listed first.
  • Allow HTML Tags on Frontend lets the live website properly render HTML tags you enter in this attribute.
  • Visible on Product View Page on Front-end determines whether the attribute is shown while viewing the product on the live site.
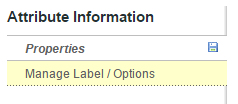
  • Click Manage Label / Options.
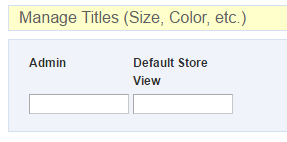
  • Enter a name for the attribute under Admin. This name will be what visitors see. If you are using multiple store views, you can enter different titles for those views, otherwise you can leave them blank.
  • If Catalog Input Type for Store Owner is set to Dropdown or Multiple Select, you can click Add Option to add the possible values for the attribute. Enter a name for each value under Admin. This name will be what visitors see. If you are using multiple store views, you can enter different names for those views, otherwise you can leave them blank.
  • When you're finished, click Save Attribute.
  • From the navigation menu, choose Catalog> Attributes > Manage Attribute Sets.
  • Click Add New Set.
  • Enter a Name and choose an existing set for this new one to be Based On.
  • Click Save Attribute Set.
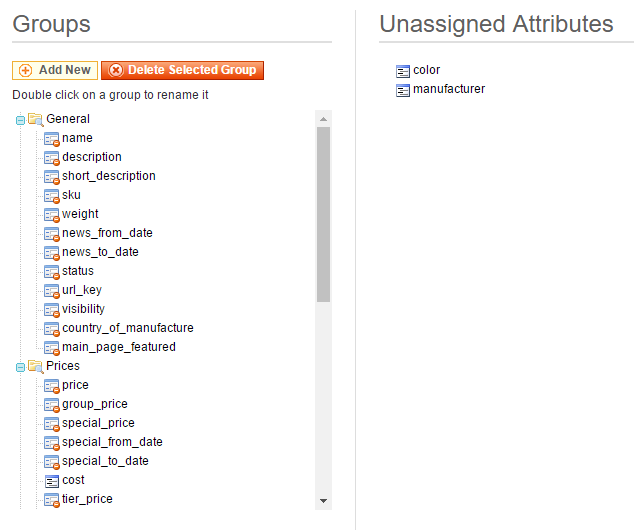
  • Click and drag any Unassigned Attributes you want into the Groups section to add them to the Attribute Set. You can also move attributes into the unassigned area as long as they do not have the red mark indicating they are required.
  • When you're finished, click Save Attribute Set.

© 2022 4.0 Help Guide